
Why Zig + Qt Feels Like Doing the Impossible Right
Preface
Make sure to check out the library libqt6zig and give it some love on GitHub, rxcalixte has done an amazing job with it and it’s a solid library with a ton of potential.
Intro
It’s no secret that I love Zig, and it’s also no secret that my favorite GUI framework by far is Qt. So naturally, when I discovered that there were Zig bindings for Qt I had to give it a try and build something with it. What I decided to build was a fairly rudimentary shopping list application, nothing fancy just one of my standard things I like to build when exploring a new GUI framework of any kind. Because a shopping list app is simple enough to not get in the way of learning the framework but also complex enough to cover a lot of the basic concepts that you’ll need to know when building a GUI application such as handling user input, displaying data, responding to different events, sorting and filtering the data and so on.
The Library
For this article and experiment I went with libqt6zig, there are other bindings libraries out there for Zig but they are QML based whereas libqt6zig is a direct binding to the Qt C++ API which I tend to prefer and it interested me a lot more because direct bindings are generally more performant and a lot harder to do correctly, so I wanted to see how well it was implemented and how well it worked in practice. The results were frankly surprisingly good and I was able to build a fully functional shopping list application with it in a relatively short amount of time, with minimal friction or trouble, I did manage to segfault a couple of times but that’s to be expected and honestly half the fun, made me kinda nostalgic in fact. I’ve also spoken about the library with its author and maintainer rcalixte who is a super nice and helpful guy with an enthusiasm for tech and programming that is infectious and I can really relate to. So honestly if you’ve ever done any GUI programming before and you’re interested in trying out Zig for GUI development I highly recommend you give libqt6zig a try, it’s a solid library with a ton of potential.
The Experience
The very first touch point is the installation of the bindings to your Zig project, this is fairly easy and well documented here, after you install all your dependencies libraries, you can initialize your new zig project with zig init as you always would, then you simply need to add the libqt6zig bindings to your zig project, you can do this a number of ways but my personal favorite is to simply use zig fetch --save git+https://github.com/rcalixte/libqt6zig.
What does Zig fetch do?
The zig fetch command will add the specified dependency to your build.zig.zon with two fields, url and hash, the url field is the URL of the git repository and the hash field is a hash of the commit at the time you added the dependency, this ensures that your project will always use the same version of the dependency even if the repository is updated later on. You can also specify the hash in your zig fetch command by adding #<commit-hash> like so: zig fetch --save https://github.com/username/repository/archive/<commit> which will essentially lock your dependency to that specific commit. Note even if you omit the hash it will lock your dependency in build.zig.zon to the the latest commit at the time you added the dependency.
What it then does is fetch the contents of the repository and stores it in your zig cache directory .zig-cache, so that it does not need to refetch it every time you build your project nor does it need internet connectivity every time you build your project.
Using the Library
We’re not quite done yet, after you’ve added the dependency to your project you need to actually link it in your build.zig file, this is fairly straightforward as well, you simply need to add the following lines to your build.zig file, so that zig build knows to link the libqt6zig library when building your project. Luckily rxcalixte has documented this process well in his readme in the Usage section. I recommend you check it out for the full details as it is subject to change and a link to the readme will always be best for the most up to date information.
OK Now let’s Build Something
This is what we are building:
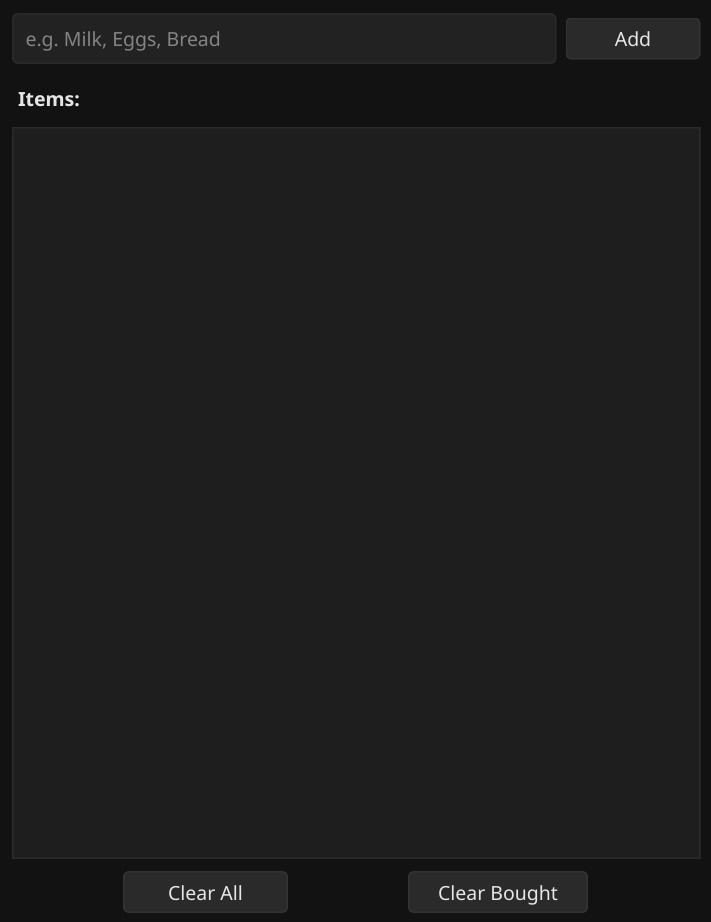
So as I’ve mentioned before I decided to build a simple shopping list application, nothing fancy just a basic CRUD application that allows you to add items to your shopping list, mark them as bought, upon which I want to apply some styles to it such as a strikethrough effect and a different color to indicate that the item has been bought and sort the item to the bottom of the list so that the unbought items are always at the top of the list. We also wanna be able to easily clean up the entire list with a single button click on “Clear All” or just clear all bought items with a click on “Clear Bought” which will only remove all the items that have been marked as bought.
Opening the Application Window
The first step to any GUI application is to first open the window, I won’t make the obvious bad pun here, you’re welcome for that by the way. To open a window with libqt6zig is fairly straightforward, you simply need to create a new widget and tell Qt to show it. That widget will serve as the main application window, and everything else.
const window = qwidget.New2();
defer qwidget.QDelete(window);
qwidget.SetWindowTitle(window, "Shopping List");
qwidget.SetMinimumSize2(window, 360, 480);
You might be confused by the use of New2 here instead of just New, this is because Qt has a lot of overloaded functions and Zig does not support function overloading, so the bindings library has to create multiple versions of the same function with different names to accommodate for that. In this case New2 is the version of New that takes no arguments, whereas New takes a parent widget as an argument.
After creating the window widget we set its title and minimum size, then we can show it by calling qwidget.Show(window);. Which I will do later after setting up the rest of the application, but if you are just playing around feel free to call it right after setting the title and size to see the window pop up.
Setting up the Layout
In Qt, layouts are what make widgets actually show up in a sensible way. to achieve what we have in the screenshot above we need to set up a vertical box layout or QVBoxLayout if you are familiar with Qt terminology. A vertical box layout is a layout that arranges widgets vertically.
const main_layout = qvboxlayout.New2();
qvboxlayout.SetSpacing(main_layout, 8);
qvboxlayout.SetContentsMargins(main_layout, 12, 12, 12, 12);
This makes a nice vertical layout with some breathing room for the elements it will contain.
Now let’s make our first row which will contain the input field and the add button.
const input_row = qhboxlayout.New2();
qhboxlayout.SetSpacing(input_row, 6);
const item_input = qlineedit.New2();
qlineedit.SetPlaceholderText(item_input, "e.g. Milk, Eggs, Bread");
const add_btn = qpushbutton.New3("Add");
qpushbutton.SetFixedWidth(add_btn, 90);
What we have here is a horizontal box layout or QHBoxLayout that will contain our input field and add button. We set the spacing between the elements to 6 pixels for a bit of breathing room. Then we create a QLineEdit widget which is the input field where the user can type in the name of the item they want to add to their shopping list. We also set a placeholder text to give the user an idea of what to type in. Finally we create a QPushButton widget which is the add button that the user will click to add the item to their shopping list. We set its fixed width to 90 pixels so that it doesn’t stretch too much.
That’s the nice part about Qt+Zig every call here is explicit and tells you exactly what it does, no magic or hidden behavior, no global “current layout” no hidden parent assignments, just pure explicitness which I find a lot nicer to read.
Now we can attach our input row and add button to the horizontal layout and then the horizontal layout to the main vertical layout.
qhboxlayout.AddWidget(input_row, item_input);
qhboxlayout.AddWidget(input_row, add_btn);
// ...More code will go here
// Add the input_row to the main layout
// qvboxlayout.AddLayout(main_layout, input_row);
As you can see we are simply adding the widgets in the order we want them to appear in the layout, then taking that layout and adding it to the main layout. This should produce the top row of our application. But it won’t do much so far, we still need to add the list view and the clear buttons.
Adding the List and Controls
Next up is the list where items will appear and the two control buttons at the very bottom with the labels “Clear All” and “Clear Bought”.
const list_label = qlabel.New3("Items:");
qlabel.SetStyleSheet(list_label, "font-weight: 600; margin-top:6px; margin-bottom:2px;");
const list_widget = qlistwidget.New2();
Qt comes with a lot of useful widgets that you can use out of the box, in this case we are using a QLabel widget to display the “Items:” label above the list and a QListWidget to display the list of items. The QListWidget is a convenient widget that allows us to easily add, remove and manipulate items in the list. We also set a bit of styling on the label to make it look a bit nicer, if you are familiar with CSS this should look pretty straightforward to you.
Now for the bottom control row:
const controls_row = qhboxlayout.New2();
const clear_btn = qpushbutton.New3("Clear All");
qpushbutton.SetFixedWidth(clear_btn, 110);
const clear_bought_btn = qpushbutton.New3("Clear Bought");
qpushbutton.SetFixedWidth(clear_bought_btn, 120);

qhboxlayout.AddWidget(controls_row, clear_btn);
qhboxlayout.AddWidget(controls_row, clear_bought_btn);
Here we create another horizontal box layout for the control buttons, then we create two QPushButton widgets for the “Clear All” and “Clear Bought” buttons. We set their fixed widths to make them look a bit more uniform. Finally we add the buttons to the horizontal layout.
And just like that we can now bring it all together by adding everything to the main vertical layout in order.
qvboxlayout.AddLayout(main_layout, input_row); // input row goes here where it belongs
qvboxlayout.AddWidget(main_layout, list_label);
qvboxlayout.AddWidget(main_layout, list_widget);
qvboxlayout.AddLayout(main_layout, controls_row);
At this point our layout hierarchy looks like this:
Main Window
├── Input Row
│   ├── QLineEdit (item_input)
│   └── QPushButton ("Add")
├── QLabel ("Items:")
├── QListWidget (list_widget)
└── Controls Row
    ├── QPushButton ("Clear All")
    └── QPushButton ("Clear Bought")
Great! Now we got our layouts and widgets all set up we can get to my favorite part which is the logic and interactivity/functionality.
The Context System
One of the more clever parts of this app is how it maps each widget to its corresponding Zig state. Because Qt signals are C-style callbacks with no built-in state, we use a global hash map to link each widget pointer to its appropriate state.
const AppCtxMap = std.AutoHashMap(?*anyopaque, *Context);
var ctx_map: AppCtxMap = undefined;
Each context holds references to the main widgets:
pub const Context = struct {
    window: ?*anyopaque,
    item_input: ?*anyopaque,
    list_widget: ?*anyopaque,
};
When we initialize the app, we register everything:
try ctx_map.put(window, ctx);
try ctx_map.put(item_input, ctx);
try ctx_map.put(add_btn, ctx);
try ctx_map.put(clear_btn, ctx);
try ctx_map.put(list_widget, ctx);
try ctx_map.put(clear_bought_btn, ctx);
That’s how any callback can later say:
fn get_ctx_for(self: ?*anyopaque) ?*Context {
    return ctx_map.get(self) orelse null;
}
The only problem and downside with this is that we are relying heavily on opaque pointers which are not type safe at all, so we have to be extra careful when working with them to avoid segfaults and other memory issues and this is precisely where I ran into some self inflicted issues and headaches with this application, completely my own fault for accepting a lack of type safety and memory safety for the sake of convenience, but it is what it is and it’s not like I was building a production ready application here, I just wanted to be clever and explore Zig and Qt together, so I accepted the tradeoff. If you decide to build something more serious with this approach I highly recommend you find a way to make it more type safe and memory safe. This is just an example of me experimenting and exploring.
Hooking up the Logic
Now that we have the UI and context system ready, it’s time to connect everything together. This is where the application actually comes alive. In Qt, widgets typically use a signal and slot mechanism, where signals (like button clicks) are connected to functions (slots) that respond to those events. In libqt6zig, these signals are exposed as plain callback functions that you can assign in Zig, so you can handle events like button clicks in a straightforward way.
Handling the Add Button
When the user clicks Add, we want to:
- Grab the text from the input field.
- If it’s not empty, create a new list item.
- Add it to the list widget.
- Clear the input field.
fn on_add_clicked(self: ?*anyopaque) callconv(.C) void {
    const ctx = get_ctx_for(self) orelse return;
    const item_text = qlineedit.Text(ctx.item_input);
    if (item_text.len == 0) return;

    const list_item = qlistwidgetitem.New3(item_text);
    qlistwidget.AddItem(ctx.list_widget, list_item);
    qlineedit.Clear(ctx.item_input);
}
We connect this function to the Add button’s clicked signal:
qpushbutton.OnClicked(add_btn, on_add_clicked);Handling the Clear Buttons
Next, we want to make the “Clear All” and “Clear Bought” buttons actually do something. The logic is simple:
- Clear All: Remove all items from the list.
- Clear Bought: Remove only items that have been marked as bought (we’ll handle this later by checking a property or style on each item).
fn on_clear_all(self: ?*anyopaque) callconv(.c) void {
    if (get_ctx_for(self)) |ctx| {
        qlistwidget.Clear(ctx.list_widget);
        return;
    }
}

fn on_clear_bought(self: ?*anyopaque) callconv(.c) void {
    if (get_ctx_for(self)) |ctx| {
        const count = qlistwidget.Count(ctx.list_widget);
        // iterate backwards so removing items doesn't shift unprocessed indices
        var i: c_int = count - 1;
        while (i >= 0) : (i -= 1) {
            const itm = qlistwidget.Item(ctx.list_widget, i);
            if (itm == null) continue;
            const state = qlistwidgetitem.CheckState(itm);
            if (state != 0) {
                // remove and delete the item
                const taken = qlistwidget.TakeItem(ctx.list_widget, i);
                // taken is removed from the widget; drop the pointer (Qt will clean up)
                _ = taken;
            }
        }
    }
}
As you can see in on_clear_all the logic is pretty straightforward, we simply call qlistwidget.Clear and give it a reference to our list widget, then Qt will handle the rest for us.
Now the more clever part comes in on_clear_bought, here we iterate through all the items in the list widget and check their state, however we know that we will sort bought items to the bottom of the list when the user ticks them as “done” or in this case “bought”, so we can optimize this a bit by iterating backwards through the list and stopping as soon as we find an unbought item, because all bought items will be at the bottom of the list. This way we avoid unnecessary iterations and checks.
All there’s left to do is to actually hook these two up to their respective buttons:
qpushbutton.OnClicked(clear_btn, on_clear_all);
qpushbutton.OnClicked(clear_bought_btn, on_clear_bought);
Marking Items as Bought
Finally, we need to handle changes to the items themselves. In our shopping list, items can be marked as bought by checking a checkbox next to them. In Qt, this is done via the CheckState property of a QListWidgetItem. Whenever the user checks or unchecks an item, we want to:
- Apply a strikethrough effect to indicate that the item is bought.
- Move the bought item to the bottom of the list to keep unbought items at the top.
fn on_item_changed(self: ?*anyopaque, item: ?*anyopaque) callconv(.c) void {
    if (get_ctx_for(self)) |ctx| {
        if (item == null) return;

        const state = qlistwidgetitem.CheckState(item);
        const is_checked = (state != 0);

        const font = qlistwidgetitem.Font(item);
        if (font) |f| {
            qfont.SetStrikeOut(f, is_checked);
            qlistwidgetitem.SetFont(item, f);
        }

        const row = qlistwidget.Row(ctx.list_widget, item);
        if (row < 0) return;

        const taken = qlistwidget.TakeItem(ctx.list_widget, row);
        if (taken == null) return;

        if (is_checked) {
            qlistwidget.AddItem2(ctx.list_widget, taken);
        } else {
            qlistwidget.InsertItem(ctx.list_widget, 0, taken);
        }
    }
}
Notice how we use TakeItem to temporarily remove the item from the list, then re-insert it in the appropriate position. This is a common trick in Qt when you want to reorder items dynamically.
Then we connect this callback to the list widget:
qlistwidget.OnItemChanged(list_widget, on_item_changed);This ensures that every time an item’s checkbox is toggled, the visual state updates and the item is moved accordingly.
Handling the Return Key
For convenience, we also allow the user to add items by pressing Enter in the input field. This is done using the OnReturnPressed signal of QLineEdit:
fn on_return_pressed(self: ?*anyopaque) callconv(.c) void {
    if (get_ctx_for(self)) |ctx| {
        const text = qlineedit.Text(ctx.item_input, allocator);
        if (text.len != 0) {
            add_item(ctx, text) catch return;
        }
        allocator.free(text);
    }
}

qlineedit.OnReturnPressed(item_input, on_return_pressed);
This function simply grabs the text from the input, adds the item if it’s non-empty, and clears the input field.
Adding Items Helper
Both the Add button and the Enter key use the same helper function to actually create and insert the list item:
fn add_item(ctx: *Context, text: []const u8) !void {
    const item = qlistwidgetitem.New7(text, ctx.list_widget);
    const flags = qlistwidgetitem.Flags(item);
    qlistwidgetitem.SetFlags(item, flags | qnamespace_enums.ItemFlag.ItemIsUserCheckable);
    qlistwidgetitem.SetCheckState(item, qnamespace_enums.CheckState.Unchecked);

    qlineedit.Clear(ctx.item_input);
}
This makes it easy to maintain consistent behavior across multiple input methods. Notice the 0x20 flag, this is Qt::ItemIsUserCheckable, which allows the checkbox to appear next to the item.
Result
At this point, all the interactive logic is wired up. Users can:
- Type an item and press Enter or click Add to add it.
- Check/uncheck items to mark them bought/unbought with a strikethrough effect.
- Clear all items or only bought items using the respective buttons.
- Automatically reorder items so unbought items remain at the top.
The result is a fully functional, minimal shopping list application built entirely in Zig using direct Qt bindings.
With the functionality in place, the next step is to make the application actually look nice. Qt widgets come with default styles that are functional but not particularly attractive. Fortunately, Qt supports CSS-like styling through SetStyleSheet, and libqt6zig exposes this feature directly.
Here’s the style sheet I used for the app:
const STYLE =
  "QWidget { background: #121212; color: #e6e6e6; font-family: 'Sans'; }"
  "QListWidget { background: #1e1e1e; color: #e6e6e6; border: 1px solid #2a2a2a; }"
  "QListWidget::item { padding: 6px 4px; }"
  "QListWidget::item:selected { background: #2a2a2a; color: #ffffff; }"
  "QLineEdit { background: #222222; color: #e6e6e6; border: 1px solid #2a2a2a; padding: 6px; border-radius: 4px; }"
  "QLineEdit::placeholder { color: #9a9a9a; }"
  "QPushButton { background: #2a2a2a; color: #e6e6e6; border: 1px solid #333; padding: 4px 8px; border-radius: 4px; }"
  "QPushButton:hover { background: #313131; }"
  "QPushButton:pressed { background: #3a3a3a; }"
  "QLabel { color: #e6e6e6; font-weight: 600; }"
;
You can apply this style sheet to the main window like so:
qwidget.SetStyleSheet(window, STYLE);Or alternatively, you can make a new file named style.qss and load it at runtime:
const qss_path = "src/shoppinglist/style.qss";
const qss_file = std.fs.cwd().openFile(qss_path, .{}) catch null;
if (qss_file) |f| {
    defer f.close();
    const data = try f.readToEndAlloc(allocator, 4096);
    qwidget.SetStyleSheet(window, data);
    allocator.free(data);
} else {
    qwidget.SetStyleSheet(window, STYLE);
}
This way you can easily tweak the styles without recompiling the app each time, additionally you can store this file anywhere on your system and allow users to customize the look of the app by providing their own style sheets if you want to get fancy.
Running the Application
Now we just need to show the window and start the event loop:
qwidget.Show(window);
_ = qapplication.Exec();
And there we have it, a simple yet fully functional shopping list application, built entirely with Zig and Qt using direct bindings, with not a hint of QML in sight. Sure, I opted to rely heavily on opaque pointers, trading off some type safety for convenience and rapid development, and I fully accept that tradeoff. For a more serious project, I would strongly recommend finding a way to make the code safer and more type-aware. Yet, despite these compromises, I was able to produce a complete, cross-platform GUI application in surprisingly little time and with minimal code. I honestly didn’t think it would be this straightforward. This is a testament both to the power of Zig as a systems programming language and to the excellent work of rcalixte in creating the libqt6zig bindings.
This wasn’t the only experiment I tried with libqt6zig. I also built a minimal launcher for my Hyperland setup, which presented some intriguing challenges related more to Wayland than the library itself. With a mix of clever window flags, absolute positioning, and careful sizing, I managed to create a “floating” window that escaped Hyperland’s tiling behavior. Thankfully, libqt6zig is robust enough that I didn’t need to manipulate XCB or wlroots directly. The bindings handled everything for me, which made the process far smoother, though it required some trial and error.
During these experiments, I also felt the absence of features like generics and compile-time reflection, which would have allowed for cleaner, more type-safe abstractions. While Zig does offer comptime capabilities, I couldn’t quite achieve what I envisioned. I also missed having access to a QTNativeWindow abstraction, which would have simplified certain window management tasks. These limitations stem more from the current state of the bindings than from Qt itself. I’ve discussed these points with the library’s author, who is aware and might implement them in the future. Until then, patience is key. We’re benefiting from the dedication of a single maintainer producing high-quality, low-level bindings for Zig.
Reflections on the Library
Working with libqt6zig was an eye-opening experience. Right from the start, I was impressed by how faithfully it exposes Qt’s C++ API while keeping the interface accessible to Zig developers. The library is surprisingly complete, covering most of the widgets, layouts, and common functionality you would expect from a typical Qt project. Despite being maintained by a single developer, the bindings are robust and consistent, which made experimentation smooth and enjoyable.
One thing that stood out is how much control you get over the GUI elements. Every widget, layout, and property is explicit, which forces you to think about your UI structure carefully. Unlike higher-level frameworks that abstract away the details, libqt6zig lets you handle memory management, widget hierarchies, and layout logic directly. This level of control can be intimidating at first, but it quickly becomes empowering once you get used to it. You feel like you are working with the core of the system rather than relying on layers of abstraction.
At the same time, the library has some limitations. Working with opaque pointers can feel risky because it removes compile-time type safety, and the lack of certain abstractions like generics or a QTNativeWindow wrapper means you occasionally need to write more boilerplate. However, these trade-offs are manageable, and the experience is educational. You learn not only how Qt works but also how to structure a cross-platform GUI application effectively in Zig.
Overall, my experience with libqt6zig was extremely positive. It made creating a fully functional shopping list application straightforward and even enjoyable. The library is well-documented, the API feels natural for Zig, and the bindings handle the low-level details so you can focus on building your application rather than wrestling with the underlying system. The potential for future improvements is exciting, and I look forward to seeing how the library evolves.
Conclusion
In conclusion, using Zig with libqt6zig provides a powerful combination for building cross-platform GUI applications. While it requires attention to memory management and pointer safety, the explicitness and control make it a rewarding experience. You can produce functional, responsive, and visually appealing applications with surprisingly little code.
For anyone interested in exploring GUI development in Zig, libqt6zig is an excellent starting point. It demonstrates that Zig can be used effectively beyond systems programming, opening the door to lightweight, high-performance desktop applications. The library is already impressive, and with continued development, it could become a go-to choice for Zig developers looking to build modern GUIs. My experiments with both the shopping list application and my Hyperland launcher showed that even complex interactions are achievable with patience and careful design. Overall, this experience reinforced my enthusiasm for Zig and its growing ecosystem, and it leaves me optimistic about the future of GUI development in this language.
References and Resources
If you want to explore libqt6zig yourself or learn more about the library and its author, here are some useful links:
- Shopping List App Source Code – The complete source code for the shopping list application built in this article.
- libqt6zig GitHub Repository – The library used for these experiments.
- rcalixte GitHub Profile – The author and maintainer of libqt6zig.
- Qt Documentation – Official Qt documentation for widgets, layouts, and styling.
- Zig Programming Language – Learn more about Zig, its syntax, and features.
- QSS Styling Guide – Qt’s CSS-like styling system for widgets.
Exploring these resources will help you get started with Zig GUI development and allow you to dive deeper into creating more complex applications.